You must be signed in to read the rest of this article.
Registration on CDEWorld is free. You may also login to CDEWorld with your DentalAegis.com account.
Fabricating provisionals is an everyday activity in a restorative practice. It is often a shared responsibility between the dentist and the clinical assistant, and is one of the key ways dentists communicate their care and skill to their patients. The author generally avoids using the term “temporary,” because despite the shorter duration the patient will have it, this restoration must meet the same criteria as a permanent restoration for fit, form, and function. Therefore, it seems more appropriate to instead use the term “provisional” or “interim restoration”—or even “prototype restoration,” which works well for anterior esthetic cases.
Criteria for Successful Provisionals
Provisionals need to accomplish multiple goals for the final restoration to be a success. At the very minimum, it is necessary that they cover the tooth and seal the dentinal tubules. Bacterial infiltration of the dentinal tubules is a major contributing factor to subsequent pulpal necrosis and the need for endodontic therapy; in fact, it is estimated that following 13% to 18% indirect restorations, the tooth requires root canal therapy.1-3 The provisionally restored tooth can be treated with medicaments containing glutaraldehyde/2-hydroxyethylmethacrylate (HEMA) (eg, Gluma®, Heraeus Kulzer; Telio CS, Ivoclar Vivadent; MicroPrime™ G, Danville Materials) to disinfect the dentinal tubules and create a coagulate plug at the time of preparation. A well-sealed provisional prevents continued bacterial contamination of the dentinal tubules and prevents fluid movement in the tubules and subsequent postoperative sensitivity.4,5 Fluid movement in the dentinal tubules pulls on the odontoblastic process at the pulpal interface and is responsible for the sensation of pain or sensitivity. Preventing leakage requires that the provisional have precisely fitting margins. One test for how well the margins are sealed is to evaluate the temporary cement upon removal of the provisional. There should be no evidence of leakage or fluid presence under the provisional; the temporary cement should be the same color and texture as the day it was cemented.
The provisional restoration is also responsible for maintaining the position of the prepared tooth after impressions have been completed. The tooth can migrate interproximally if adequate contacts are not established. The tooth can also migrate occlusally or tip if the occlusal contacts are not precisely created. The author strives for a minimum of two occlusal contacts on a posterior provisional, one of which occurs on a cusp tip and the other in a receiving area (Figure 1). By directing force down the long access of the tooth, the two contacts prevent super-eruption and tipping. The creation of the interproximal contacts and embrasure form is also critical to the gingival health during the period between tooth preparation and placement of the final restoration. The objective is to prevent the patient from packing food interproximally, having difficulty with oral hygiene, or having tooth forms that traumatize the gingival health.
Provisionals as Treatment Aids
Beyond these minimum criteria for a provisional to be successful, the provisional restoration can often be used as part of the diagnostic process of treatment. It is quite common for a patient to present with symptoms of a cracked tooth. The patient will complain of a sharp, stabbing pain on biting or release that disappears rapidly. The pain can often be replicated using a tooth sleuth or orange wood stick to isolate an individual cusp while the patient applies biting pressure. There are multiple treatment options including containment of the cusps with an indirect restoration, with or without endodontic therapy. Predicting whether or not containment of the cusps will be sufficient to eliminate the patient’s symptoms can be determined with a well-made provisional by observing the symptoms. Provisionals can also be used for caries control when the destruction of the tooth is extensive, although direct composite is so versatile and durable in this application that provisionalization may not be necessary. In cases that include ovate pontics or anterior implants, the provisional will be used for tissue development and contouring prior to taking final impressions.6
Provisionals as Esthetic Prototypes
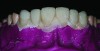
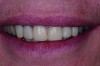
In esthetic restorative cases, the provisional serves as a prototype for the final restorations. It is important for the patient to have a chance to see and approve changes to tooth position, shape, length or arrangement prior to receiving the final porcelain restorations. The provisional also allows dentists to confirm that the changes work functionally from both a phonetic and occlusal perspective. In these cases, the changes are made first in a diagnostic wax-up on a set of mounted models. The changes are then transferred to the mouth in the provisional restorations. For esthetic changes, patients wear the provisional, and the dentist makes changes to these prototype restorations until they are happy with the result. At this point, impressions are taken of the provisional that will be sent to the ceramist and can be duplicated in the final restorations. The provisional are observed for functional issues, like difficulty with “f” or “s” sounds, and can be altered accordingly. Provisionals that wear or fracture are an indication of occlusal issues that also need to be resolved in this phase of treatment to avoid incorporating these challenges into the final restorations.
Provisional Fabrication Methods
Provisional restorations can be fabricated in multiple ways depending on the presenting clinical situation. The most common method of fabricating a provisional is to use the existing tooth form as a guide. A matrix is taken of the tooth prior to the preparation. The matrix can be taken with many materials including alginate, vinyl polysiloxane (VPS) impression material, and thermoplastic buttons. The author’s preference for this type of a matrix is to use bite registration silicone in a triple tray (Figure 2).7,8 The advantage of bite registration silicone over VPS is its rigidity. The more rigid the material, the less flexing that will occur when the matrix is returned to the mouth to form the provisional. Flex equals distortion, which results in more trimming to get the shape of the provisional correct. The more rigid the matrix is, the less time and effort are required during the trimming process.
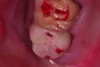
The triple tray should be loaded with bite registration silicone only on the side of the tooth to be prepared. The opposing side should not be loaded because the rigidity of the material prevents reseating it in the mouth with both sides impressed. The teeth should be thoroughly dried with an air water syringe; the practitioner should then place the triple tray in the patient’s mouth and have the patient bite together. Most of these materials set in 30 to 60 seconds, after which the impression can be removed from the mouth and set aside. To make the provisional, the bis-acryl should be loaded into the matrix and reseated over the prepared tooth; the patient should then again close his or her mouth and bite (Figure 3 and Figure 4).9,10 After allowing the material to set to the gel phase, the matrix should be removed from the mouth. The provisional should remain in the matrix if it is removed at the correct stage, and the material should be allowed to continue to fully set in the matrix before removal. If the tooth being prepared is fractured or a portion is missing, it is important to recreate the tooth form prior to taking a matrix. This can be accomplished with wax or composite.
In many cases, including anterior esthetics, dentists are altering the tooth position or shape and need to fabricate the provisional off a diagnostic wax-up. The provisional matrix can be made by the laboratory or can be done in the practitioner’s office. The author makes a point of always requesting a solid model of the wax-up from the laboratory, so if it is necessary to make additional matrices, it will not involve working on the wax. Matrices can be made from many materials, including VPS and vacuform. When using a silicone matrix, it needs to cover enough of the teeth to remain rigid and stable, even after the preparations. The more flexible the matrix, the more likely it is to distort or flex during seating and material setting. This flex usually occurs at the gingival borders and results in a thick bulk of bis-acryl that must be trimmed back to create the margins and proper emergence profile. The author normally makes a full-arch matrix for larger cases. It is also important that the occlusal portion of the silicone be flat to enable the practitioner to apply even pressure when seating it, and it should be thick enough to be rigid and not flex when seated. Cutting a notch between the central incisors is recommended to serve as a guide during seating. These matrices can be made in a pressure pot to increase accuracy, or relined with a light-body material that is compatible with the putty being used.
Many people prefer a plastic matrix fabricated using a vacuform or mini-star machine. One advantage of this type of matrix is the ability to see through it. You will also need to cover an adequate number of teeth to allow proper seating of the matrix. These matrices are highly accurate and pick up the fine detail of the wax-up. However, in this case, flexibility is both a benefit and a risk. The flexibility allows the copyplast to be peeled off the set bis-acryl easily, but it also introduces the risk of flexure during seating and setting. To prevent this flexing during fabrication of the provisional, an additional rigid layer can be formed over the top from 1 mm biocryl. This biocryl layer adds a rigid outer shell and can be separated easily from the inner layer of copyplast after the bis-acryl is set. However, it is not desirable to use a rigid material like biocryl alone as the provisional matrix, because it will not be possible to separate it from the bis-acryl once it has set.
The laboratory can fabricate a shell provisional that is a copy of the wax-up. There are several techniques that the laboratory can use to do this, including CAD/CAM fabrication with newer milled provisional materials. These materials are very durable and work well for longer-term provisionals. Using a shell provisional requires hollowing out the internal surfaces of the shell to ensure it is fully seated over the final preparations. The next step is to reline the shell with bis-acryl to customize the fit and the margins.
Once the matrices have been prepared, there are several processes to fabricate the provisional after the tooth or teeth are prepared. The most common method is to work directly in the mouth, placing the matrix over the prepared teeth. For single units or cases with a small number of prepared teeth, direct fabrication can be quite efficient. The matrix is loaded with bis-acryl and placed over the preparations, which have been thoroughly dried. If a triple tray matrix is being used, the patient should be asked to close gently into the opposing side. The set times of the bis-acryl are an important key to proper technique. Most materials have a gel phase during which the material is designed to be removed to avoid shrinkage and locking of the material into undercuts or interproximal embrasures. At the appropriate set time of the gel phase, the matrix should be removed from the mouth; the bis-acryl form of the provisional should remain in the matrix. If the provisional remains on the tooth, this is an indication it was left in the mouth slightly too long. In this case, a plastic instrument can be used to remove it from the prepared tooth.
Due to the fragile nature of the bis-acryl before it is set, if the matrix is pulled at the gel phase for anterior veneers, the material may tear. In this case, the author allows the matrix to stay in place on the prepared teeth for an additional 30 seconds before removing the matrix to avoid locking. Shrink-wrap provisionals use a technique whereby the material is intentionally locked on at a full set. The excess material is then skillfully trimmed away intraorally, avoiding damage to the prepared teeth. This technique can be helpful for retaining provisionals on conservatively prepared anterior veneers. The bis-acryl must now be left to fully cure, either in the matrix or on the countertop. The practitioner should be aware that when provisionals are fabricated on the teeth, they will leave behind a thin air-inhibited layer of resin, which can be easily cleaned off with alcohol. However, if this layer of resin is left behind, it can interfere with the set of some VPS impression materials.
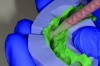
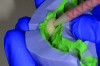
Provisionals can also be made indirectly on a model of the prepared teeth. For a large number of preparations, this technique can be ideal for both dentist and patient. It allows the dentist to work outside the mouth with improved visualization and to use the model to finish margins (Figure 5 and Figure 6). For the patient, it can be a welcome break from a long dental procedure. A quick alginate impression of the prepared teeth can be acquired and poured in rapid-set stone. A silicone model can also be fabricated in an alginate impression from die silicone and silicone bite registration material. If working on a stone model, the practitioner should thoroughly coat the model with a lubricant to prevent the bis-acryl from sticking. The matrix is filled and seated against the model and held in place until the material is fully set.
Having a bur system of preferred instruments to trim and shape provisionals will increase their precision and efficiency. The author uses three sizes of carbide burs, including a large egg-shaped E-cutter for when there is a large amount of excess material. A medium-sized tapered carbide is used to relieve the internal surface of the provisional to allow full seating against the margins, and a small flame-shaped carbide or diamond can be used to add surface morphology and occlusal anatomy to provisionals in the final stage before polishing. Trimming excess to refine margins and the emergence profile can be done with a tapered carbide or a silicone wheel that has a knife edge, but silicone wheels are preferred by the author to create the incisal and gingival embrasure form. These discs are designed to pull and flex to create the rounded forms needed in embrasures to ensure tissue health. For multiple prepared teeth, it is preferable to leave the provisional splinted for additional retention. Ensuring that the gingival embrasures are adequately opened will allow tissue rebound and the placement of floss threaders. The last phase involves finely polishing the bis-acryl. The polish not only creates a surface texture that is pleasant to the patient’s tongue, but it also reduces plaque accumulation on the materials surface.11
Conclusion
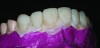
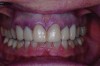
A well-made provisional restoration is a key step in the overall success of the final restoration. It involves providing the patient with a comfortable experience between the preparation and placement of the final restoration, protecting the long-term health of the pulp by limiting bacterial exposure, and creating ease of seating by maintaining the position of the prepared tooth (Figure 7 and Figure 8).
References
1. Felton D. Long term effects of crown preparation on pulp vitality. J Dent Res. 1989;68:1009. Abstract 1139.
2. Bergenholtz G. Pathologic mechanisms in pulpal disease. J Endod. 1990;16(2):98-101.
3. Zach L. Pulp liability and repair: effect of restorative procedures. Oral Surg Oral Med Oral Pathol. 1972;33(1):111-121.
4. Pashley DH. Dentin permeability, dentin sensitivity, and treatment through tubule occlusion. J Endod. 1986;12(10):465-474.
5. Brännström M. Communication between the oral cavity and the dental pulp associated with restorative treatment. Oper Dent. 1984;9(2):57-68.
6. Kan JY, Rungcharassaeng K, Lozada J. Immediate placement and provisionalization of maxillary anterior single implants: 1-year prospective study. Int J Oral Maxillofac Surg. 2003; 18(1):31-39.
7. Mamoun JS, Javaid M. Triple tray crown and bridge procedures: a guide to how dental assistants can assist the dentist: part 2. Dent Assist. 2013;82(4):32-39.
8. Mamoun JS, Javaid M. Triple tray crown and bridge procedures: a guide to how dental assistants can assist the dentist: part 1. Dent Assist. 2013;82(3):14-33.
9. Strassler HE. Fixed prosthodontics provisional materials: making the right selection. Compend Contin Educ Dent. 2013;34(1):22-30.
10. Perry RD, Magnuson B. Provisional materials: key components of interim fixed restorations. Compend Contin Educ Dent. 2012;33(1):59-62.
11. Sen D, Göller G, Işsever H. The effect of two polishing pastes on the surface roughness of bis-acryl composite and methacrylate-based resins. J Prosthet Dent. 2002;88(5):527-532.
About the Author
Lee Ann Brady, DMD
Private Practice
Glendale, Arizona