You must be signed in to read the rest of this article.
Registration on CDEWorld is free. You may also login to CDEWorld with your DentalAegis.com account.
To achieve excellent, long-lasting esthetics, an understanding of tooth morphology is mandatory not only in the creation of a restoration but also in the preparation of the tooth. Successful minimally invasive porcelain restorations have demonstrated significantly greater success when bonded to enamel than when bonded to dentin. In fact, research has demonstrated that veneers that were bonded to dentin and had margins in dentin were 10 times more likely to fail than veneers that were bonded to and marginated in enamel.1 Before clinicians put a bur to a tooth, they must ask themselves if they understand the layers and thickness of the tooth. This has become even more important as the profession has shifted to emphasize responsible esthetics and the practice of minimally invasive dentistry.2 Minimally invasive dentistry facilitates a systematic respect for the original tissue.3 Implied in this is that the dental profession recognizes that an artifact is of less biologic value than the original tissue. Therefore, without a clear understanding of the tissue itself, it is nearly impossible to practice minimally invasive dentistry.
Minimally Invasive Preparation
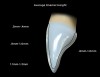
It has been demonstrated that enamel conservation, especially at the margins, increases the strength and fracture resistance of porcelain restorations and decreases their chance of failure. Depth cut burs can help to achieve the exact amount of reduction that should be completed in a preparation. For outcome-based preparation design and to ensure adequate and even tooth reduction, this amount is dependent upon the material that is selected and the color of the tooth that is to be restored. For each incremental change in shade that is desired, studies have shown that 0.2 mm to 0.3 mm of reduction is required. For example, a 0.3-mm reduction is necessary to go from shade A2 to A1, and a 0.9-mm reduction is needed to go from shade A4 to A1 (Figure 1).4,5 However, as is shown in a polarized cross-sectional photograph of a central incisor (Figure 2), enamel depth differs in every area of the tooth. The average depth of enamel changes across the facial surface of incisors from the incisal one-third (approximately 1.0 mm), to the middle one-third (approximately 0.9 mm), and to the cervical one-third (approximately 0.3 mm) (Figure 3).6 Without knowing this, even the most conservative use of a depth cut bur can potentially eliminate all of the enamel near the gingival margin.7
What should be considered when performing minimally invasive preparations is that, in most cases, the tooth will receive a veneer that will modify its final contour. With that consideration, there may be areas that require significant reduction, whereas other areas may not require any preparation at all. An excellent concept to ensure only minimal enamel reduction is to "begin with the end in mind." In this technique, a matrix is used to place a bis-Acrylic mockup of the final desired outcome over the existing teeth, then depth cuts are placed in the provisional material and reduced to the desired depth.8 This ensures that the prepared teeth are only reduced in the areas that are necessary.
Basics of Tooth Morphology
It is clear that clinicians need to understand tooth morphology when preparing teeth, but how important is morphology when it comes to restoring them? The aim of cosmetic dentistry is to improve dental esthetics with regard to the color, position, shape, size, and alignment of the teeth as well as the overall appearance of the smile. However, in reality, cosmetic dentistry is an illusion, and an understanding of the microesthetics of the teeth is the magic wand that makes it possible.
Throughout the years, dentistry has been an ever-changing landscape regarding the materials, the skills of dentists and technicians, and the technology. One of the unchanging parts of this landscape is tooth morphology. Consider the amazing depth, texture, shadows, and highlights achieved by classical artists in their sculptures. These works of art appear almost lifelike despite the fact that the stone that they were created from is monochromatic. This is a fine example of how shape alone can trump color all day long. According to Kataoka and Nishimura, in order to create esthetically pleasing restorations that are works of art in teeth, practitioners must understand the three basic elements of morphology.9
The first element involves the three basic geometric shapes that define the primary anatomy of the tooth, which are square, ovoid and tapered, and triangular. Which of these three shapes the patient's teeth resemble needs to be considered when adapting restorations to the patient's face and remaining dentition.
Next is the creation of secondary anatomy, such as lobes. Lobes are anatomic divisions that are essential to reproduce when restoring the proper composition of a tooth. Secondary tooth anatomy is the result of normal tooth development, and it refers to the depressions and undulations found in maxillary anterior teeth that give rise to their unique facial contours.
Finally, the third element is texture.10 Altering the reflective surface of teeth can have a major impact on their appearance. Surface texture, also known as tertiary anatomy, describes the physical characteristics of the enamel surface, including the vertical development with lobes, horizontal development with cervical ridges, and structural development with perikymata. Perikymata and other various forms of surface stippling are usually present in younger teeth but often lost in older teeth. This loss of anatomy occurs secondarily to frictional forces that erode the morphology over time. The appearance of the enamel is affected by the interaction of light with the textures on its surface. Light will exhibit a "glossy" appearance when reflected off of convex surfaces, and it will exhibit a "matte" appearance when reflected off of concave surfaces (Figure 4).6
The ability to create texture is arguably the most important factor in replicating nature with composite or porcelain, especially considering that not all restorative materials are created equal. Research by Elgendy and colleagues showed that, within the limitations of their study, none of the resin build-up techniques were able to reproduce the dental tissue's optical properties and that the clinical success of restorative procedures depends on selecting materials and techniques that emulate the natural tooth and provide long-term stability in both color and optical properties.11
Creating Cosmetic Illusions
The key to controlling the apparent size and depth of anterior restorations and teeth is the ability to control the light that is reflected off of them.12-15 Modifying the quality of the light that is reflected or deflected from objects affects how they are perceived. This can be used to alter the appearance of a tooth in regard to size, shape, and other aspects. Regarding the shape of anterior restorations, the critical areas that control perception are the line angles and the space in between them. Generally speaking, the more mesially and distally located the line angles are and the flatter the space in between, the wider a tooth will look.
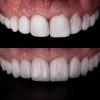
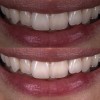
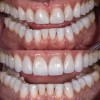
For example, a patient presented with existing composite veneers, and the teeth, specifically the centrals, looked extremely wide (Figure 5). The patient was concerned that the porcelain restorations would look the same. As the green and red lines in this image demonstrate, the narrow line angles in the photograph to the right (ie, red lines) give the illusion of a much narrower tooth than the wide line angles in the previous composite restorations in the photograph to the left (ie, green lines).
The art of illusion in cosmetic dentistry may play its biggest role in diastema closures. In the absence of orthodontic treatment, closing spaces with resin or porcelain without making the teeth look too wide can be a daunting task. In this example, a patient presented for a cosmetic consultation (Figure 6). His chief complaint was that he wanted the space between his maxillary centrals closed. After he refused orthodontic treatment, the decision was made to close the space with resin. Choosing resin, as opposed to porcelain, allowed the preparation to be limited to enameloplasty on the distal aspect and required no facial or mesial reduction. With proper development of the line angles, the contour of the space between the line angles, and the contour of the facial embrasures, a space that at first appeared impossible to close without orthodontic treatment was completely closed with effective but minimal treatment (Figure 6).
Illusory works of art are indeed fascinating. They create a reality from an unrealistic situation. Although illusions distort our perception of reality, their effect is generally shared by most people.16 As has been demonstrated, many factors contribute to the success of the esthetics of a restoration, but no factor is more important than shape. Simply stated, shape is king. Of course, color and other factors also play a role in the appearance of a tooth. Differences in color can alter the perception of size. The brighter the tooth, the bigger it will look, and the opposite is also true. In Figure 7, the same exact photograph was duplicated with the brightness increased, clearly showing what appears to be a size increase in the teeth themselves. This is a simple yet effective example of a powerful dental illusion.
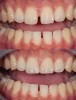
In another example of illusion, differences in height can affect the perception of width. A study examined whether the taller of two equally wide stimuli looked thinner, and conversely, whether the thinner of two equally tall stimuli looked taller.17 The results confirmed the conventional wisdom that being tall makes something look thinner. This phenomenon is also applicable to teeth. Figure 8 shows a before-and-after photograph with almost identical widths in the incisal one-third. However, the added length that can be seen in the postoperative photograph creates the look of narrower teeth.
Conclusion
The outcome of esthetic dental treatment is determined by three basic principles: color, shape, and texture. The knowledge of optical illusions and techniques to recreate them in anterior restorations can determine the success or failure of an esthetic outcome. Understanding these principles, as well as the substrate that is being worked on, allows clinicians to minimize the amount of biologic substance that is sacrificed. Although patients place more importance on the esthetic results, it is the clinician's duty to maintain their dental health by creating the most conservative restorations possible. Consequently, complex dental treatment must be successfully accomplished in a way that is efficient and at the same time predictable. When minimal and controlled inclinations and the flattening or rounding of tooth structure is combined with different textures, clinicians can create an "image" of teeth that differs from reality. Teeth can be made to appear longer or shorter and narrower or wider in accordance with the clinical situation and both the clinician's and patient's desires. Most patients are not satisfied with their smile, but they continuously reject the ideal orthodontic treatment. Current dental materials and technologies can offer smart solutions to these shortcomings, including the noninvasive shaping of the dental tissue in the dental practice directly with composite materials18,19 or with laboratory-processed minimal or no-preparation porcelain veneers.
About the Author
Adamo E. Notarantonio, DDS
Fellow
American Academy of Cosmetic Dentistry
Fellow
International Congress of Oral Implantologists
Private Practice
Huntington, New York
References
1. Gurel G, Sesma N, Calamita MA, et al. Influence of enamel preservation on failure rates of porcelain laminate veneers. Int J Periodontics Restorative Dent. 2013; 33(1):31-39.
2. Farias-Neto A, de Medeiros FCD, Vilanova L, et al. Tooth preparation for ceramic veneers: when less is more. Int J Esthet Dent. 2019;14(2):156-164.
3. Ericson D. What is minimally invasive dentistry? Oral Health Prev Dent. 2004;2(Suppl 1):287-292.
4. Lacy AM, Wada C, Du W, et al. In vitro microleakage at the gingival margin of porcelain and resin veneers. J Prosthet Dent. 1992;67(1):7-10.
5. Celebi AT, Icer E, Eren MM, et al. Thermal-stress analysis of ceramic laminate veneer restorations with different incisal preparations using micro-computed tomography-based 3D finite element models. J Mech Behav Biomed Mater. 2017;75:302-313.
6. Bazos P, Magne P. Bio-emulation: biomimetically emulating nature utilizing a histoanatomic approach; visual synthesis. Int J Esthet Dent. 2014;9(3):330-352.
7. Pahlevan A, Mirzaee M, Yassine E, et al. Enamel thickness after preparation of tooth for porcelain laminate. J Dent (Tehran). 2014;11(4):428-432.
8. Kern M, Ahlers MO. Controlling the depth of ceramic veneer preparations by using a color marker in the depth grooves. J Prosthet Dent. 2015;114(6):862-864.
9. Kataoka S, Nishimura Y, Sadan A. Nature's Morphology: An atlas of tooth shape and form. 1st ed. Chicago, IL: Quintessence Publishing; 2002.
10. Riquieri H. Dental Anatomy and Morphology. 1st ed. Chicago, IL: Quintessence Publishing; 2019.
11. Elgendy H, Maia RR, Skiff F, et al. Comparison of light propagation in dental tissues and nano-filled resin-based composite. Clin Oral Investig. 2019;23(1):423-433.
12. Zolotarev VM, Grisimov VN. Architectonics and optical properties of dentin and dental enamel. Opt Spectroscopy. 2001;90(5):753-759.
13. Hariri I, Sadr A, Nakashima S, et al. Estimation of the enamel and dentin mineral content from the refractive index. Caries Res. 2013;47(1):18-26.
14. Vaarkamp J, ten Bosch JJ, Verdonschot EH. Propagation of light through human dental enamel and dentine. Caries Res. 1995;29(1):8-13.
15. O'Brien WJ. Fraunhofer diffraction of light by human enamel. J Dent Res. 1988;67(2):484-486.
16. Solso RL. Cognitive Psychology. 6th ed. Boston, MA: Allyn & Bacon; 2000.
17. Beck DM, Emanuele B, Savazzi S. A new illusion of height and width: taller people are perceived as thinner. Psychon Bull Rev. 2013;20(6):1154-1160.
18. Villarroel M, et al. Direct esthetic restorations based on translucency and opacity of composite resins. J Esthet Restor Dent. 2011;23(2):73-87.
19. Schmeling M, DE Andrada MA, Maia HP, et al. Translucency of value resin composites used to replace enamel in stratified composite restoration techniques. J Esthet Restor Dent. 2012;24(1):53-58.